Cp Cm1312 Cannot Feed Envelopes Error Jam Message
Z7_3054ICK0KGTE30AQO5O3KA30N0
Paper Jam Error Message Displays on the Control Panel for HP LaserJet Pro MFP M201 and M202 Printer Series
This document is for HP LaserJet Pro MFP M201 and M202 printer series
When trying to print, one of the following Paper Jam error messages displays on the printer control panel.
-
Jam in cartridge area
-
Jam in output bin
-
Jam in duplex area
This video shows how to fix the paper jam error message on the control panel for a LaserJet Pro MFP M201 and M202 printer

Solution one: Turn the printer off and then on again
Turning the printer off and then on partially resets the printer. Follow these steps to restart the printer, and then print a test page.
Step 1: Turn the printer off and then on again
Follow these steps to turn off the printer, and then turn it on again.
-
Press the Power button to turn off the printer. If the printer does not turn off, disconnect the power cord from the rear of the printer.
-
Wait 60 seconds.
-
Reconnect the power cord to the rear of the printer.
-
Press the Power button to turn on the printer.
note:
The printer might go through a warm-up period, which might last several minutes. Wait until the warm-up period completes before you continue.
Step 2: Print a Configuration Report
Print a Configuration Report to make sure that the hardware functions correctly.
-
Make sure that there is unused, plain white letter or A4 paper in the input tray.
-
On the printer control panel, press the OK button.
-
Press the Right Arrow (
 ) to scroll to the Reports menu, then press the OK button.
 -
Press the Right Arrow (
) to scroll to the Configuration Report menu, then press the OK button. The Configuration Report prints.
Solution two: Clear a paper jam in the cartridge area
A Jam in cartridge area message displays on the printer control panel. Follow these steps to resolve the issue.
-
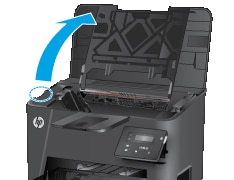
With the printer turned on, disconnect the power cord from the rear of the printer, and then open the top cover.
warning:
To avoid risk of injuries or electric shock, you must disconnect the power cord before you reach inside the printer.
Figure : Open the top cover
-
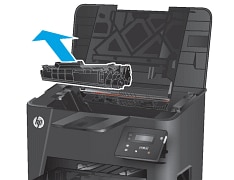
Remove the toner cartridge.
Figure : Remove the toner cartridge
-
Remove any jammed paper from the cartridge area. Use both hands to remove jammed paper to avoid tearing the paper.
note:
If the paper tears while you remove it, check the rollers and wheels for any torn pieces of paper thatmight remain inside. Use a flashlight to thoroughly look for torn pieces of paper. If any torn pieces of paper remain inside the printer, more paper jams might occur.
Figure : Remove the jammed paper
-
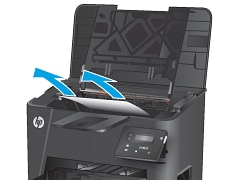
Reinsert the toner cartridge.
Figure : Reinsert the toner cartridge
-
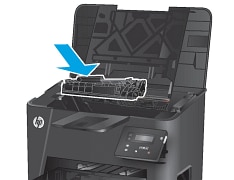
Close the top cover.
Figure : Close the top cover

-
If the error message still displays on the control panel, press OK to clear it.
Solution three: Clear a paper jam in the output bin area
A Jam in output bin message displays on the printer control panel. Follow these steps to resolve the issue.
-
Open the top cover.
Figure : Open the top cover
-
Pull out the green tab to release the jam-access cover.
Figure : Release the jam-access cover
-
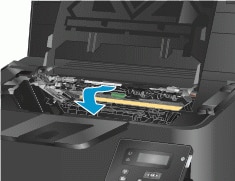
Remove any jammed paper.
Figure : Remove the jammed paper

-
Close the jam-access cover.
Figure : Close the jam-access cover

-
Close the top cover.
Figure : Close the top cover
-
If the error message still displays on the control panel, press OK to clear it.
Solution four: Clear a paper jam in the duplex area
A Jam in duplex area message displays on the printer control panel. Follow these steps to resolve the issue.
-
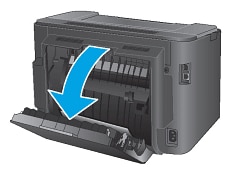
Open the rear access door.
Figure : Open the rear access door
-
Disconnect the power cord from the rear of the printer.
warning:
To avoid risk of injuries or electric shock, you must disconnect the power cord before you reach inside the printer.
-
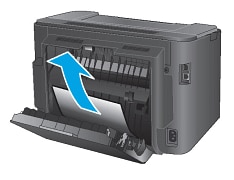
Use both hands to remove jammed paper to avoid tearing the paper.
note:
If the paper tears while you remove it, check the rollers and wheels for any torn pieces of paper thatmight remain inside. Use a flashlight to thoroughly look for torn pieces of paper. If any torn pieces of paper remain inside the printer, more paper jams might occur.
Figure : Remove the jammed paper
-
Close the rear door.
Figure : Close the rear door

-
If the error message still displays on the control panel, press OK to clear it.
Solution five: Reset the printer
Sometimes a paper jam error persists even though there is no jammed paper (false paper jam). Follow these steps to reset the printer, which might clear a false paper jam error, and then print a test page.
Step 1: Reset the printer
Follow these steps to reset the printer.
-
With the printer turned on, disconnect the power cord from the printer.
-
Unplug the power cord from the power source.
-
Wait 60 seconds.
-
Reconnect the power cord to a wall outlet and to the printer.
note:
HP recommends plugging the printer directly into a wall outlet.
Step 2: Print a Configuration Report
Print a Configuration Report to make sure that the hardware functions correctly.
-
Make sure that there is unused, plain white letter or A4 paper in the input tray.
-
On the printer control panel, press the OK button.
-
Press the Right Arrow (
) to scroll to the Reports menu, then press the OK button. -
Press the Right Arrow (
) to scroll to the Configuration Report menu, then press the OK button. The Configuration Report prints.
Solution six: Service the printer
Service or replace your HP product if the issue persists after completing all the preceding steps.
Go to Contact HP Customer Support to schedule a product repair or replacement. If you are in Asia Pacific, you will be directed to a local service center in your area.
To confirm your warranty status, go to HP Product Warranty Check. Repair fees might apply for out-of-warranty products.
Source: https://support.hp.com/id-en/document/c04457722
0 Response to "Cp Cm1312 Cannot Feed Envelopes Error Jam Message"
Post a Comment